Hugoのテーマ「Icarus」を使ってブログ作ってみた

静的サイトジェネレータ「Hugo」でブログを作成します。
(サイトの公開は次回)
- 開発環境
- Hugoのインストール
- テンプレートフォルダを作成する
- テーマを選ぶ
- Icarusをダウンロードする
- Icarusの設定
- ローカル環境でサイトを確認する
- 記事の追加
- プロフィールのアイコンを変更する
- まとめ
開発環境
以下が開発環境になります。
【Click!】Homebrewのインストール方法
Homebrewのインストール
ターミナルで以下のコマンドを実行します。
/usr/bin/ruby -e "$(curl -fsSL https://raw.githubusercontent.com/Homebrew/install/master/install)"
これでHomebrewがインストールされました。
公式HP:Homebrew
Hugoのインストール
ターミナルで以下のコマンドを実行します。
brew install hugo
これでHugoがインストールされました。
Hugoのバージョン確認
hugo version
公式HP:Hugo
テンプレートフォルダを作成する
ファイルを管理する階層型のフォルダを作成します。
フォルダの保存場所と名前を決めます。
例として、 Documents (書類)の中に sample_site というフォルダを作ります。
ターミナルで以下のコマンドを実行します。
Documentsに移動
cd ~/Documents
テンプレートフォルダを作成
hugo new site sample_site
これでテンプレートフォルダが作成されました。
テーマを選ぶ
以下のページからデザインテーマを選びます。
公式HPにないテーマなどもあるので、GitHubなどでも探してみましょう。
今回は「Icarus」というテーマを選びます。
Icarus
Icarusをダウンロードする
ターミナルで以下のコマンドを実行します。
themesに移動
cd themes
cd ~/Documents/sample_site/themes
Icarusをダウンロード
git clone https://gitlab.com/toryanderson/hugo-icarus.git
これでIcarusをダウンロードできました。
Icarusの設定
Icarusの場合、このままではサイトを実行できないので2つ設定をします。
- exampleSiteのすべてのファイルをsample_siteにコピーする
- themesDirをコメントアウトする
この設定はIcarusの README.md に書かれています。
Setup
Next, navigate to the exampleSite folder at themes/hugo-type-theme/exampleSite/ . In order to get your site running, you need to copy config.toml and all the content of all relevant subfolders such as data/l10n.toml into the root folders.
To turn the exampleSite folder in a standalone demo site the themesDir property has been set to ../.. . This way you can preview this theme by running hugo server inside exampleSite folder.
Due to the customized themesDir path Hugo will fail to find themes if you copied the config.toml into the root directory of a regular Hugo website. Make sure you comment out the themesDir property if you use the theme in production.
直訳
設定
次に、 themes/hugo-type-theme/exampleSite/ にある exampleSite フォルダに移動します。サイトを実行するには config.toml や data/l10n.toml などの関連するすべてのサブフォルダのコンテンツをルートフォルダにコピーする必要があります。
スタンドアロンのデモサイトで exampleSite フォルダを有効にするために、 themesDir プロパティが ../.. に設定されています。 exampleSite フォルダ内で hugo server を実行すると、このテーマをプレビューできます。
カスタマイズされた themesDir パスが原因で、 config.toml を通常のHugo Webサイトのルートディレクトリにコピーした場合、Hugoはテーマを見つけることができません。本番環境でテーマを使用する場合は、必ず themesDir プロパティをコメントアウトしてください。
1. exampleSiteのすべてのファイルをsample_siteにコピーする
sample_site/themes/hugo-icarus/exampleSite/ にある exampleSite フォルダを開きます。
exampleSite内のすべてのファイルをコピーして、sample_siteにペーストします。
これでサイトがデフォルトのデザインになります。
2. themesDirをコメントアウトする
exampleSite の config.toml をコピーしたので、 sample_site の config.toml がデフォルトの状態になっていると思います。
config.toml(デフォルト)
config.toml
baseurl = "https://example.org/"
languageCode = "en-us"
title = "Icarus"
# Enable comments by entering your Disqus shortname
disqusShortname = ""
# Enable Google Analytics by entering your tracking code
googleAnalytics = ""
# Define the number of posts per page
paginate = 10
footnotereturnlinkcontents = "↩"
theme = "hugo-icarus"
# Comment the themesDir option if you use this theme in production
themesDir = "../.."


[permalinks]
    post = "/:year/:month/:day/:slug"


[params]
    # Tell me who you are
    author = "John Doe"
    bio = "Blogger - Programmer - Gopher"
    location = "Earth"
    site_description = ""
    copyright  = "Powered by [Hugo](//gohugo.io). Theme by [PPOffice](https://github.com/ppoffice)."
    avatar = "css/images/avatar.png"
    # Enter your email address to display your Gravatar icon in the profile. If not set the theme
    # will fallback to the avatar.
    gravatar = "you@example.com"
    logo = "css/images/logo.png"
    disable_mathjax = false # set to true to disable MathJax

    # define which types of pages should be shown. By default the type with the most regular pages
    mainSections = ["post"]

    # Format dates with Go's time formatting
    date_format = "2006-01-02"

    # Add custom assets with their paths relative to the static folder
	custom_css = []
	custom_js  = []

# Create custom menu entries by defining a label and a link for
# them. Since you can also link posts, you've the option the
# place the links before or after them.
#
# E.g.: "Home" appears before all linked posts in the menu
# and "Tags" / "Categories" after them.
[[params.menu]]
    before = true
    label  = "Home"
    link   = "/"

[[params.menu]]
    before = false
    label  = "Tags"
    link   = "tags/"

[[params.menu]]
    before = false
    label  = "Categories"
    link   = "categories/"

# Enter a link for the follow button on the left
[params.profile]
    follow_button = "https://github.com/gohugoio"


[social]
# Add your social network accounts to the profile section on the left
# by entering your username. The links to your account will be
# created automatically.
    github          = "gohugoio"
    gitlab          = ""
    bitbucket       = ""
    jsfiddle        = ""
    codepen         = ""
    foursquare      = ""
    dribbble        = ""
    deviantart      = ""
    behance         = ""
    flickr          = ""
    instagram       = ""
    youtube         = ""
    vimeo           = ""
    vine            = ""
    medium          = ""
    wordpress       = ""
    tumblr          = ""
    xing            = ""
    linkedin        = ""
    slideshare      = ""
    stackoverflow   = ""
    reddit          = ""
    pinterest       = ""
    googleplus      = ""
    facebook        = ""
    facebook_admin  = ""
    twitter_domain  = ""
    twitter         = "gohugoio"

# Enable and disable widgets for the right sidebar
[params.widgets]
    recent_articles = true
    categories = true
    tags = true
    tag_cloud = true
config.toml をテキストエディタで開き、 themesDir の前に # を追記してコメントアウトします。
#themesDir = "../.."
これでサイトを実行できるようになりました。
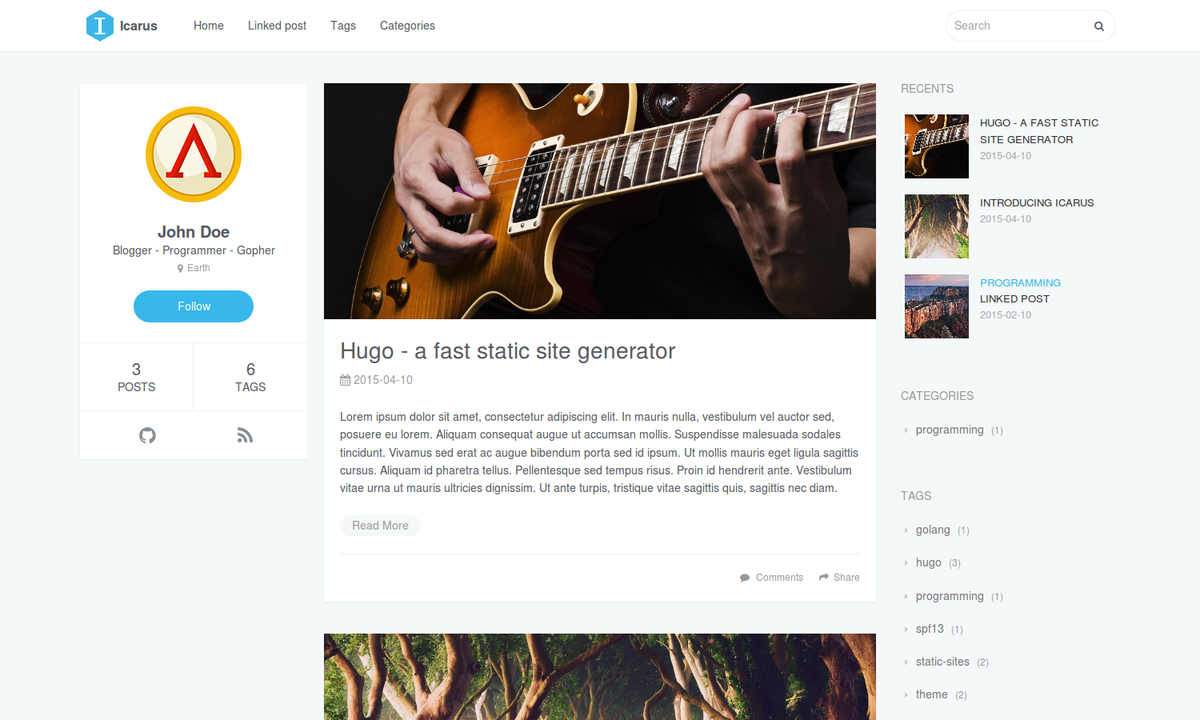
ローカル環境でサイトを確認する
ターミナルで以下のコマンドを実行します。
sample_siteに移動
cd sample_site
cd ~/Documents/sample_site
ローカル環境でサイトを実行
hugo server
▼ 下書きを表示する場合 ▼
hugo server -D
コマンド実行後に以下のURLをブラウザで開くとサイトを確認できます。
記事の追加
ターミナルで以下のコマンドを実行します。
sample_siteに移動
cd sample_site
cd ~/Documents/sample_site
記事の追加
hugo new sample.md
▼ フォルダ分けをする場合 ▼
hugo new post/sample.md
sample_site/content にMarkdown形式で作成されます。
新規ファイルを作成した場合、 draft: true になっており下書きの状態なので、公開する場合はここを false に変更しましょう。
---
title: "Sample"
date: 2021-10-21T13:15:19+09:00
draft: true
---
プロフィールのアイコンを変更する
左サイドバーのプロフィール画像には「Gravatar」が使われているので、こちらを登録します。
登録にはWordPressのアカウント(無料)が必要になります。
アカウントを作るか、既存のアカウントでログインしてください。
アカウントができたら config.toml をテキストエディタで開き、 gravatar に「マイ Gravatar」に設定してあるメールアドレスを記入します。
gravatar = "自分のメールアドレス"
これでプロフィール画像の設定ができました。
まとめ
- Hugoのインストール
- テンプレートフォルダを作成
- テーマ「Icarus」をダウンロード
- Icarusの設定
- 記事作成・ローカル環境で表示・プロフィール画像変更
次回サイトをWeb上に公開します。